AUTO SCALING IN AWS
Project Overview
In this project, I use the AWS Command Line Interface (CLI) to launch an Amazon EC2 instance that hosts a web server and create an Amazon Machine Image (AMI) from it. The AMI then serves as the foundation for deploying a system that automatically scales under variable workloads through Amazon EC2 Auto Scaling. To ensure high availability and efficient traffic distribution, I also configure an Elastic Load Balancer that distributes incoming requests across multiple EC2 instances running in different Availability Zones.
What is Auto Scaling?
This is a feature in AWS that automatically adjusts the number of running servers (EC2 instances) in response to the amount of work or traffic your application is receiving. When demand increases, Auto Scaling launches more instances to handle the load; when demand drops, it terminates the extra ones to save costs. Think of it like a restaurant that hires more waiters during busy lunch hours and sends some home when it gets quiet. Auto Scaling ensures your application always has just the right number of “waiters” (servers) to serve customers efficiently without wasting resources. This is important because it ensures that applications remain available, reliable, and cost-efficient. It helps maintain performance during peak periods while avoiding unnecessary expenses during low-traffic times.
What is a Load Balancer?
This is a service in AWS that distributes incoming traffic evenly across multiple servers (EC2 instances). It acts as a single point of access for users, ensuring that no single server becomes overloaded while others sit idle. This improves performance, reliability, and availability of applications. It is important because it helps prevent downtime, improves fault tolerance, and provides a smooth user experience even if one server fails. The Load Balancer automatically directs traffic to healthy instances and can span multiple Availability Zones to maintain consistent performance. Think of it like a receptionist in a busy office who directs visitors to different service counters so that no single counter gets overwhelmed. Similarly, a Load Balancer efficiently distributes user requests to keep your system running smoothly.
This is our starting architecture:
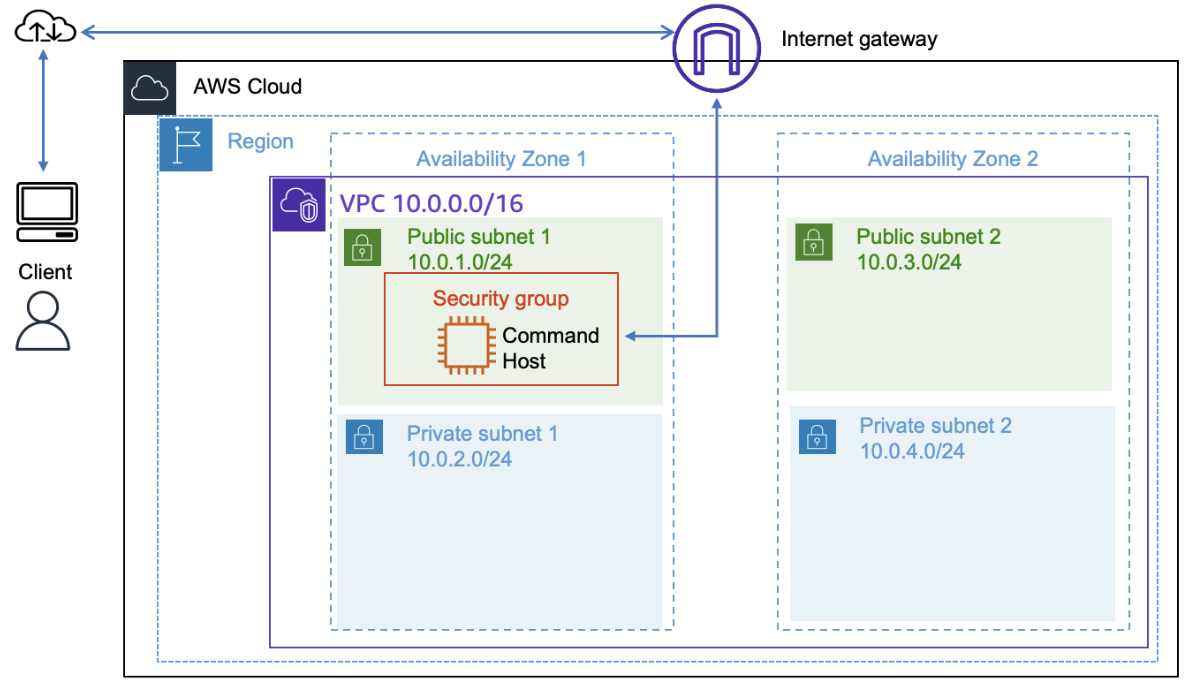
Final architecture: 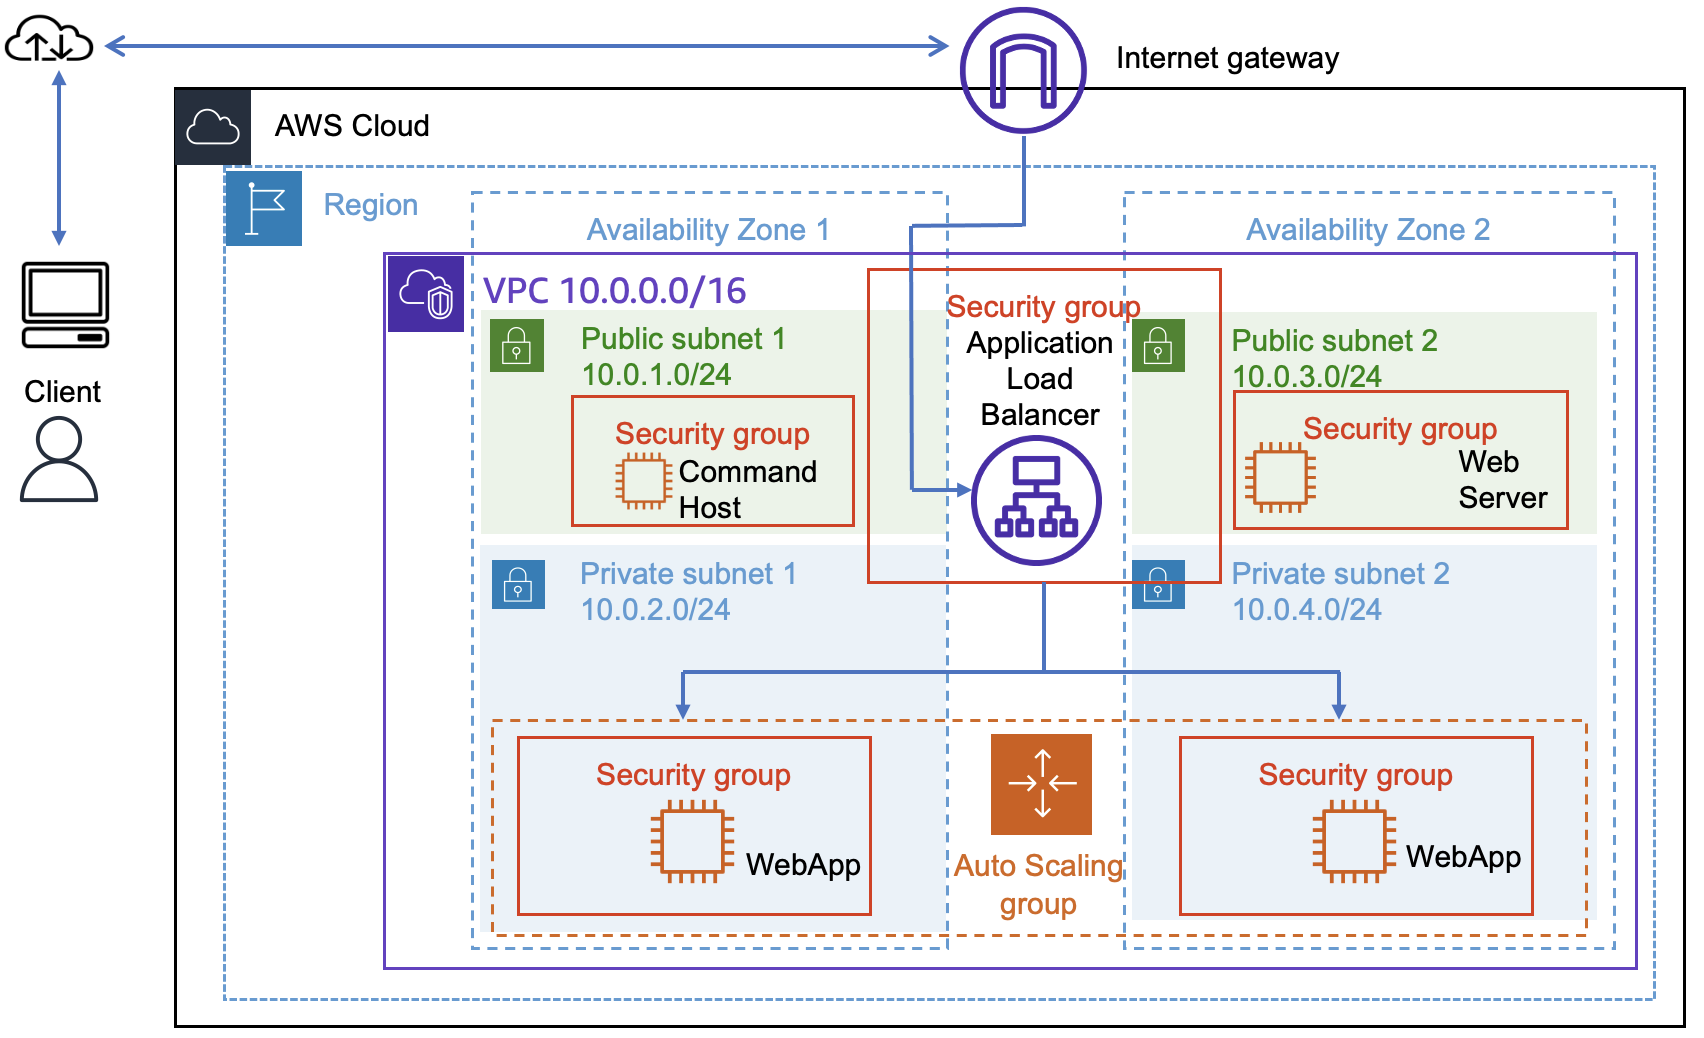
Step 1: Creating a new AMI for Amazon EC2 Auto Scaling
Step 1.1: Connecting to the Command Host Instance
I established an SSH connection to the Command Host instance, which had already been created, to complete the following tasks.
Step 1.2: Configuring the AWS CLI
Let’s first ensure that the instance is in the region us-west-2
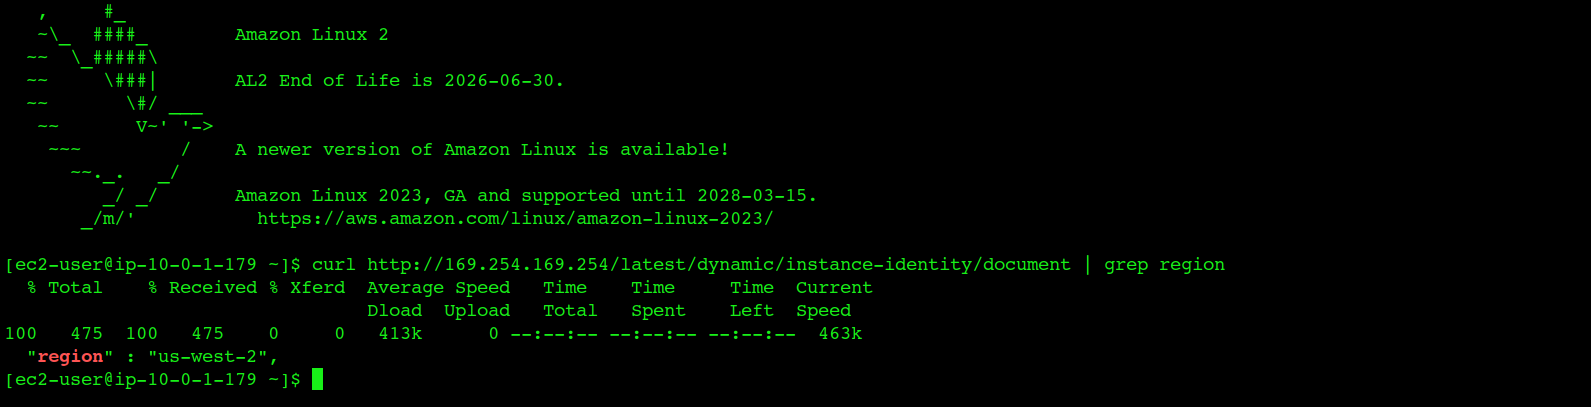 I used the
 aws configure command to set up the AWS CLI by entering the Access Key ID, Secret Access Key, region name, and output format.
Step 1.3: Creating a new EC2 Instance
We will now use the configured aws CLI to create a new instance. Let’s inspect the UserData.txt that was installed as part of the Command Host creation.
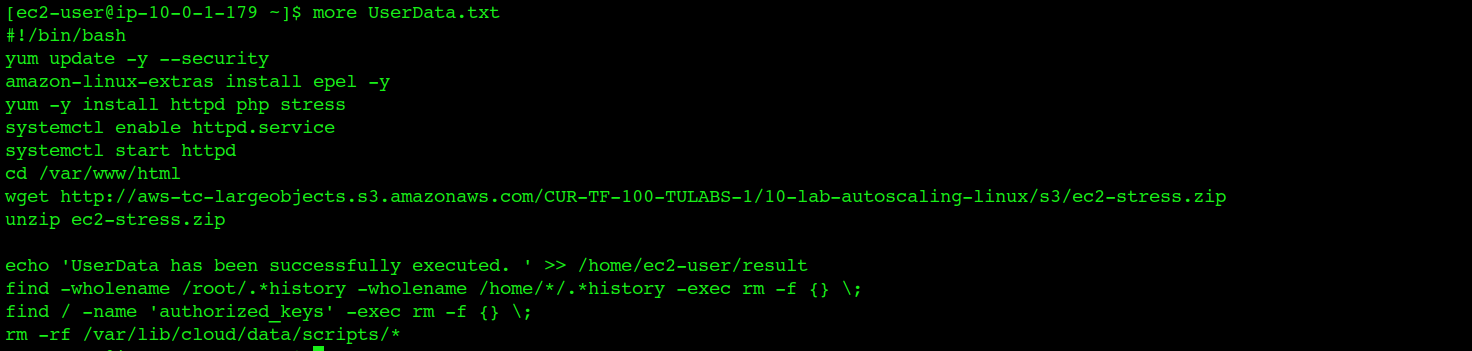 The script performs the following:
- Uses Bash shell to run the script.
- Updates all system packages with the latest security patches.
- Enables the EPEL repository for extra software packages.
- Installs Apache web server, PHP, and the stress testing tool.
- Enables Apache to start automatically on boot.
- Starts the Apache web server service.
- Navigates to the web server’s root directory.
- Downloads a ZIP file containing web content from an S3 bucket.
- Extracts the downloaded ZIP file.
- Logs a message confirming successful execution of the user data script.
- Deletes all user and root command history files for security.
- Removes all SSH authorized key files to disable prior SSH access.
- Cleans up cloud-init script data to prevent re-execution on reboot or reuse.
Let’s now create an instance using the specified key pair, AMI ID, security group, and subnet — along with the provided user data script to configure the instance automatically. 
Given that the instance starts a new web server, let’s test that the web server was installed properly. To do this we must obtain the public DNS name using the following command:

Verifying that the web server works: 
Step 1.4:Creating a Custom AMI
In this step, we create an AMI based on the instance that we created.

Step 2: Creating an auto scaling environment
In this section, I create a load balancer that distributes traffic across a group of EC2 instances using a single DNS address. Auto Scaling is configured to dynamically adjust the number of instances based on the Amazon Machine Image (AMI) created in the previous task. Additionally, I set up CloudWatch alarms to scale out or scale in the instances whenever CPU utilization crosses specified thresholds. For this lab, the task is performed using the AWS Management Console, though it could also be done via the AWS CLI.
Step 2.1: Creating an Application Load Balancer
An Application Load Balancer (ALB) automatically distributes incoming web traffic across multiple EC2 instances and Availability Zones, improving application availability, fault tolerance, and scalability. In this task, an ALB is created and configured to work with a target group of EC2 instances.
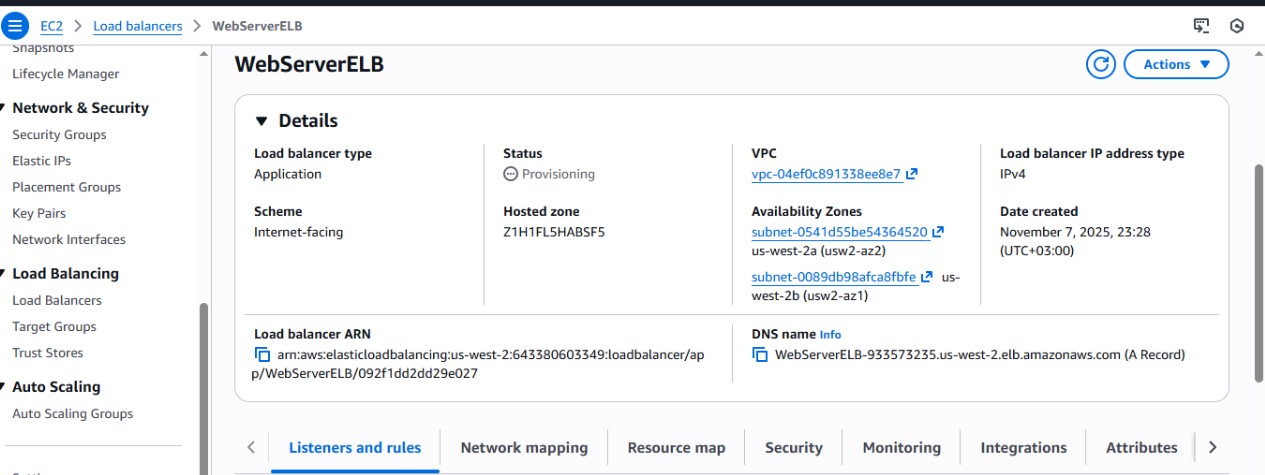
Steps: In this task, I created an Application Load Balancer (ALB) to distribute incoming traffic across multiple EC2 instances in the two Availability Zones. I started by navigating to the Load Balancers section in the EC2 Management Console and chose to create a new Application Load Balancer. I entered the load balancer name as WebServerELB, set the scheme to internet-facing, and used the default IPv4 address type.
Next, I selected the VPC and mapped the load balancer to both Availability Zones, assigning each zone to a public subnet. I assigned a security group that allowed HTTP access.
I then created a target group named webserver-app, set the target type to Instances, and configured the health check path as /index.php. After registering the EC2 instances to this target group, I returned to the load balancer configuration and set the default action to forward traffic to the newly created target group.
Finally, I created the load balancer and confirmed that it was successfully launched. I viewed the load balancer and copied its DNS name to use later in the lab. This setup ensures that incoming web traffic is efficiently distributed and that the system can scale as needed.
Step 2.2: Creating a launch template
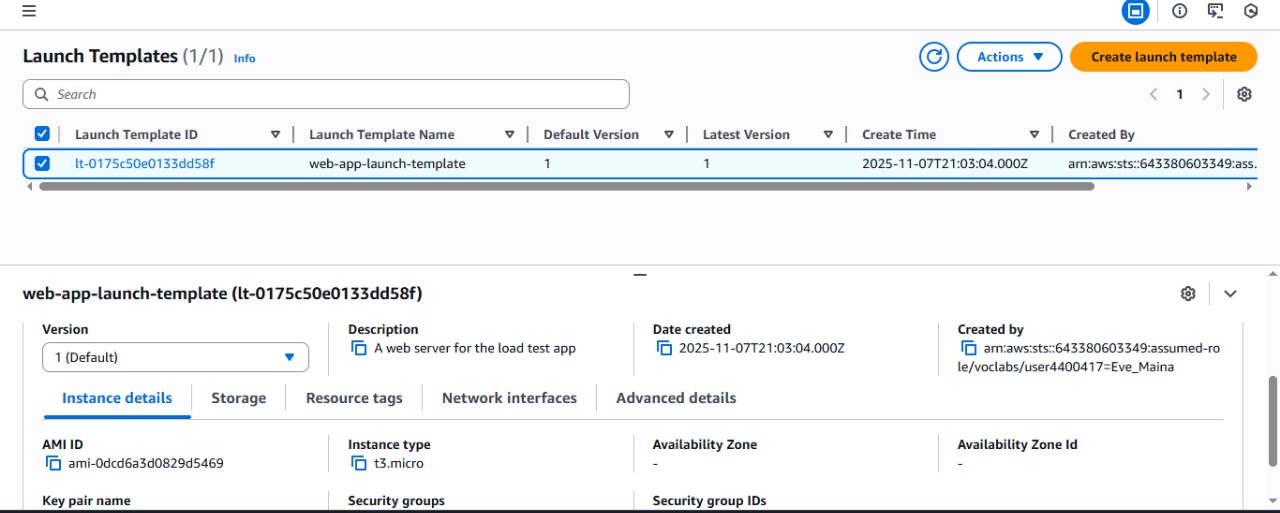
In this step, I created a launch template that my Auto Scaling group would use to launch EC2 instances. A launch template defines key configuration details for new instances, such as the AMI, instance type, key pair, security group, and storage settings.
I began by navigating to the Launch Templates section in the EC2 Management Console and selecting the option to create a new launch template. I entered web-app-launch-template as the launch template name and added a brief description, “A web server for the load test app.” I also enabled the Auto Scaling guidance option to help set up a template compatible with EC2 Auto Scaling.
Next, under the Application and OS Images section, I selected the My AMIs tab and confirmed that WebServerAMI was already chosen. This is the AMI we created earlier .For the instance type, I selected t3.micro, and under the key pair section, I set the dropdown to “Don’t include in launch template,” since I would not be connecting to the instance in this lab.
In the network settings, I chose a security group that allowed web traffic to the instances that will be launched from this template. After reviewing the configuration, I created the launch template and received a confirmation message stating that web-app-launch-template was successfully created. I then viewed the newly created template to ensure it was ready for use with my Auto Scaling configuration.
Step 2.4: Creating an Auto Scaling group
I used the launch template we created to create an Auto Scaling group.
First, I selected web-app-launch-template, and from the Actions dropdown, I chose Create Auto Scaling group.
On the Choose launch template or configuration page, I entered Web App Auto Scaling Group as the name of the Auto Scaling group and then clicked Next.
On the Choose instance launch options page, under the Network section, I selected my VPC from the VPC dropdown list.
For the Availability Zones and subnets, I chose Private Subnet 1 (10.0.2.0/24) and Private Subnet 2 (10.0.4.0/24). Then I proceeded by choosing Next.
On the Configure advanced options page, under Load balancing, I chose Attach to an existing load balancer.
From the existing load balancer target groups, I selected webserver-app | HTTP.
In the Health checks section, I enabled Elastic Load Balancing health checks. After that, I chose Next.
Next, on the Configure group size and scaling policies page, I set the group size with a desired capacity of 2, minimum capacity of 2, and maximum capacity of 4.
I then selected the Target tracking scaling policy option. For the metric type, I chose Average CPU utilization and entered 50 as the target value.
This configuration ensures the Auto Scaling group maintains an average CPU utilization of 50 percent by automatically adding or removing instances based on the workload.
I then clicked Next through the Add notifications page.
On the Add tags page, I added a tag with the key Name and value WebApp, and then clicked Next.
Finally, I reviewed all configurations and chose Create Auto Scaling group.
This setup launches EC2 instances in private subnets across both Availability Zones. 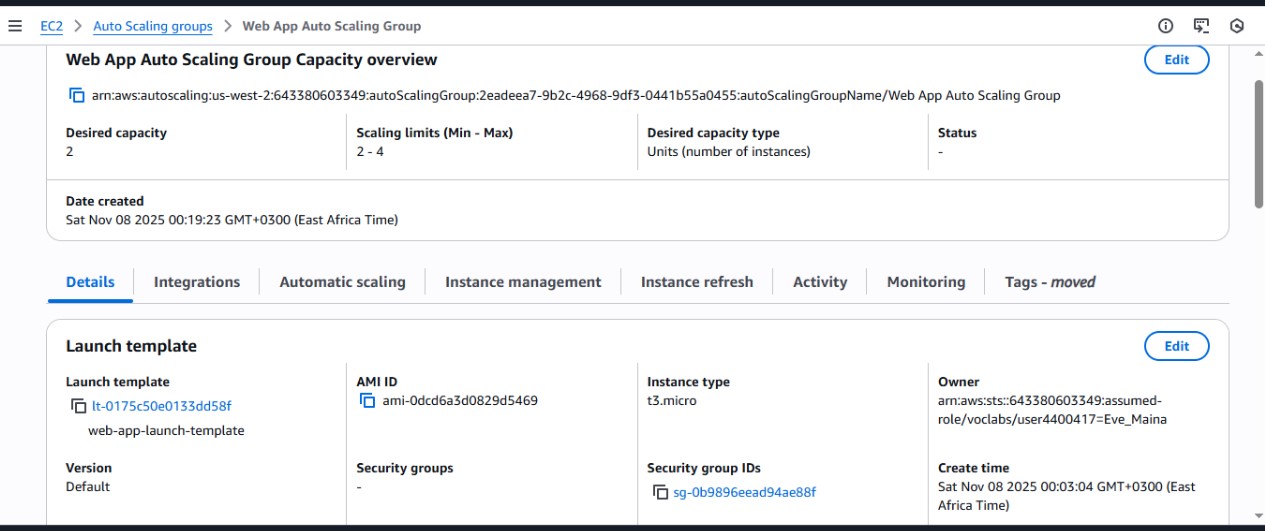
Step 3: Verifying the auto scaling configuration
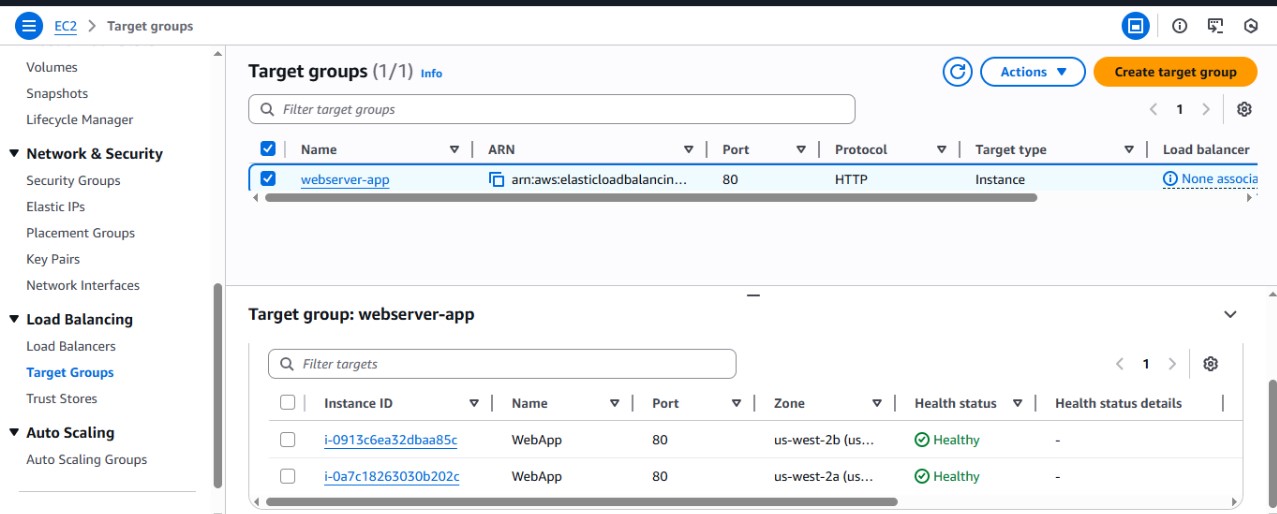
Let’s verify that both the auto scaling configuration and the load balancer are working .
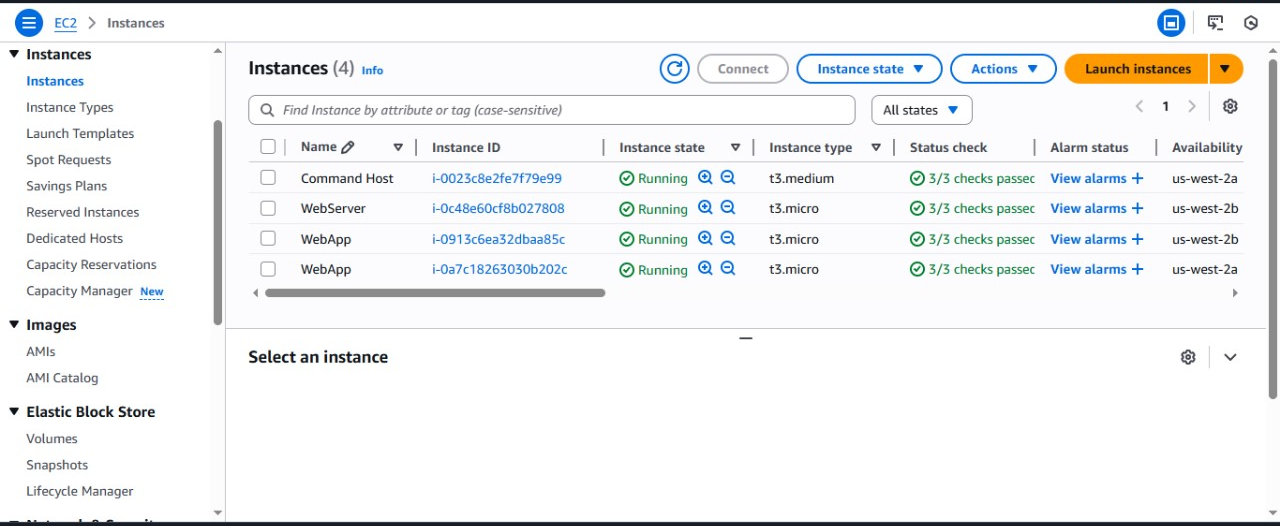 The two Web App instances have been created as part of the auto scaling group
Testing auto scaling configuration
Once the Auto Scaling group was created, I tested its functionality by opening a new browser tab and pasting the DNS name of the load balancer I had copied earlier. When the web page loaded, I clicked “Start Stress,” which triggered the stress application to run in the background. This caused the CPU utilization on the instance handling the request to rise to 100 percent.
I then navigated to the running instances section on the Management console to check whether new instances were created. 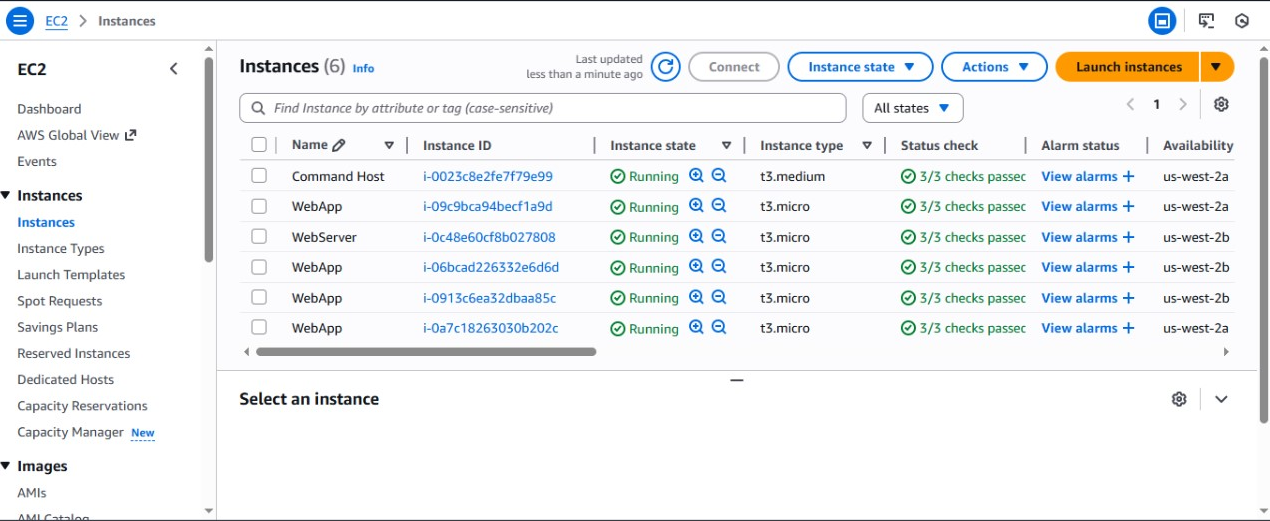 This confirmed that Amazon CloudWatch had detected a rise in average CPU utilization above the set threshold of 50 percent, prompting the Auto Scaling group to scale up and add two more instances.
In conclusion, this task demonstrated how load balancing and auto scaling work together to maintain application performance and availability. By using CloudWatch metrics and automated scaling policies, the system was able to detect high CPU usage and respond by launching additional instances to handle the increased load. This ensures that the application remains responsive under varying levels of demand while optimizing resource utilization and cost efficiency.